Stadium construction reinforcement construction organization design method
First, the reinforcement method: 1, the layer removed to the structural layer, and then all the structural cracks repair (filling rubber reinforcing), for the joints, you can use the back cover rubber backing seam reinforcement; 2. Reinforce (one layer) the carbon fiber reinforced by the long-distance direction in the area where the structure bears the negative bending moment. See the attached plan for the specific range; pre-dip the carbon fiber with high tensile strength into the composite reinforcement sheet with epoxy resin ( One-way continuous fiber sheet) is pasted on the structure to be reinforced along the direction of tension or perpendicular to the direction of cracks with an epoxy resin adhesive to form a new composite body, so that the reinforced patch and the existing reinforced concrete are subjected together Forces increase the tensile or shear resistance of the structure and increase strength, stiffness, crack resistance, and structural ductility. Second, the construction preparation: 1. Material preparation: sand (middle sand), stone (5-32), carbon fiber using Japan Toray UT70-30, sticky carbon matching glue (bottom glue, impregnated glue, leveling glue, respectively, using Chinese Academy of Science, MSP, MSE, MSR series), crack filling glue and back cover glue adopt CABR architectural filling glue of China Academy of Science and Technology. 2. Machine preparation: Angle grinder, steel brush, electric shovel, bubbler, Japanese Kosei KONYBOND crack injection repairing method supporting equipment (such as attached color pages), iron trowels, trolleys, shovels. 3, technical preparation: According to the plan, advance the line in the field, turn on water, electricity. Third, the main construction methods and steps 1, the original beam cut chisel: Use the angle grinder to put the line range, cut to the floor structure surface, and then use an electric shovel to remove the surface layer of the floor shovel with a power shovel. After the smashing pieces of garbage are bagged with garbage bags, the field is removed by hand cart. 2, crack reinforcement: (1) Investigation of internal structure of cracks: Determine the width, depth, and length of the cracks, determine the appropriate viscosity of the epoxy resin according to the crack width, and estimate the amount of epoxy resin, sealant, and syringe. (2) Base surface treatment: Use a metal brush or a grinding wheel to level the surface of the cracks to remove dust, oil, and other contaminants. (3) Mount the fixed BC pedestal: Install 5 syringes per meter of crack, ie 5 syringes per meter. Mark the injection point on the crack. The BC pedestal was mounted at the marked injection point. The mounting pedestal used the HS sealant. The attention was paid to these positions of the BC pedestal to align the cracks, so that the epoxy resin could easily enter the inside of the crack. (4) sealant sealing cracks: seal the surface of the crack with a good sealant to prevent epoxy resin outflow. Before the start of the injection work, it is necessary to verify again that the base of the fissure base has been sealed. (5) Mixed epoxy resin: The epoxy resin main agent and the curing agent are mixed in a specific ratio, and the amount of one-time mixed resin is equivalent to one hour. With a syringe, the mixed epoxy resin is extracted, and after the extraction is completed, the automatic strip of the syringe is stuck on the stopper of the piston to prevent the piston from moving so as to avoid extruding the epoxy resin. (6) Injection of Epoxy Resin: Install the epoxy resin syringe on the BC base, and then according to different pressures Requires the required number of rubber bands. After all the syringes and rubber bands are installed, the syringe's piston is rotated clockwise until the brake bar is released from the bayonet, and the syringe starts to work at a uniform and uniform speed under the pressure of the rubber band. When the epoxy in the syringe has been injected, remove the empty syringe immediately and replace it with another syringe containing epoxy resin to continue the injection. In order to ensure that all cracks are filled, all empty syringes must be newly extracted with epoxy to continue the injection. (7) Curing curing: After the syringe is at rest for 24 hours, remove the syringe and BC base. The entire strip of HS sealant was torn off and polished with a grinding wheel. Fourth, carbon fiber reinforcement: Conduct carbon fiber reinforcement for all negative moment load concentration areas and paste them according to the attached plan area. The specific method is as follows: 1, the adhesive configuration: (1) The raw materials are weighed accurately according to different mix ratios, and the base coat compound, leveling compound and binding compound are respectively configured. Diluent is added to the main polymer material and mixed uniformly. Then, the filler is added and stirring is continued until it is even. Finally, the curing agent is added, and the mixture can be used after being fully stirred. (2) The following matters should be taken into account when configuring the rubber compound: The amount of the primer coating compound should be 1-2 kilograms per time; the amount of the leveling compound material should be 0.5-1 kilograms per time; The allocation of 1-2 kg is appropriate. (3) All rubber materials are required to be completed within one hour. 2, substrate processing (1) The site of concrete surface where exfoliation, honeycombing, corrosion, etc., are to be degraded should be removed. For a large area of ​​inferior layer, polymer cement mortar is used for repair after removal. (2) Cracks should be closed if necessary. (3) Use concrete angle grinder, grinding wheel (sandpaper) and other tools to remove impurities such as laitance and oil on the surface of concrete. The concrete on the base surface of the component must be polished and smoothed, especially the protruding part of the surface should be smoothed. Chamfering and grinding into an arc (R310mm). (4) Clean the concrete surface with a hair dryer and keep it dry. Use the Chinese Academy of Science to research and produce EC high-strength polymer mortar to repair the bottom of the sunken surface. 3, primer (1) The main agent and the curing agent are placed in a container in a certain ratio and stirred with a stirrer. The amount of the main agent is determined according to the actual temperature at the site, and the use time is strictly controlled. (2) Spread the glue evenly on the surface of the concrete component with a barrel brush or a brush, and the thickness should not exceed 0.4mm. Do not leak the brush or have run-off or air bubbles. After the glue is cured (the curing time depends on the temperature at the site, and the finger The dryness of the touch is appropriate, generally not less than 2 hours), and then the next process. 4, leveling with plastic material leveling (1) The concave part of the concrete surface shall be filled with a scraper, filled and leveled with a scraper, and the parts with a difference in height between the formwork joints shall be filled with a leveling compound to minimize the height difference. (2) Treatment of corners, use smoothing compound to repair it as a smooth arc with a radius of not less than 10mm. (3) The leveling compound must be cured (the curing time depends on the on-site temperature, and it is appropriate to dry with a finger, generally not less than 2 hours) before proceeding to the next process. 5, paste carbon fiber cloth (1) Cut the carbon fiber cloth according to the design requirements. Unless otherwise specified, the length of the carbon fiber cloth should be within 3m. (2) Dispose, stir and paste the rubber material, then evenly apply to the pasted part with the roller brush, and apply more on the lap and corner parts. (3) Using a special smooth roller to repeatedly roll on the surface of the carbon fiber cloth in the same direction until the rubber material leaks out of the outer surface of the carbon fiber cloth to remove air bubbles, so that the carbon fiber cloth fully infiltrates the rubber material. Multi-layer paste should repeat the above steps until the surface of the fiber is touch-sensitive and dry, before the next layer of carbon fiber cloth paste. (4) Spread evenly a layer of adhesive on the outermost layer of carbon fiber cloth. 6, ground recovery Because the original ground is not reinforced, so the use of artificial stirring 1:2 cement mortar (57 glue, in order to maintain the old and new joints at the joints are good, mixed with UEA expansion agent) can be, the ground surface with iron wiping pressure recovery.
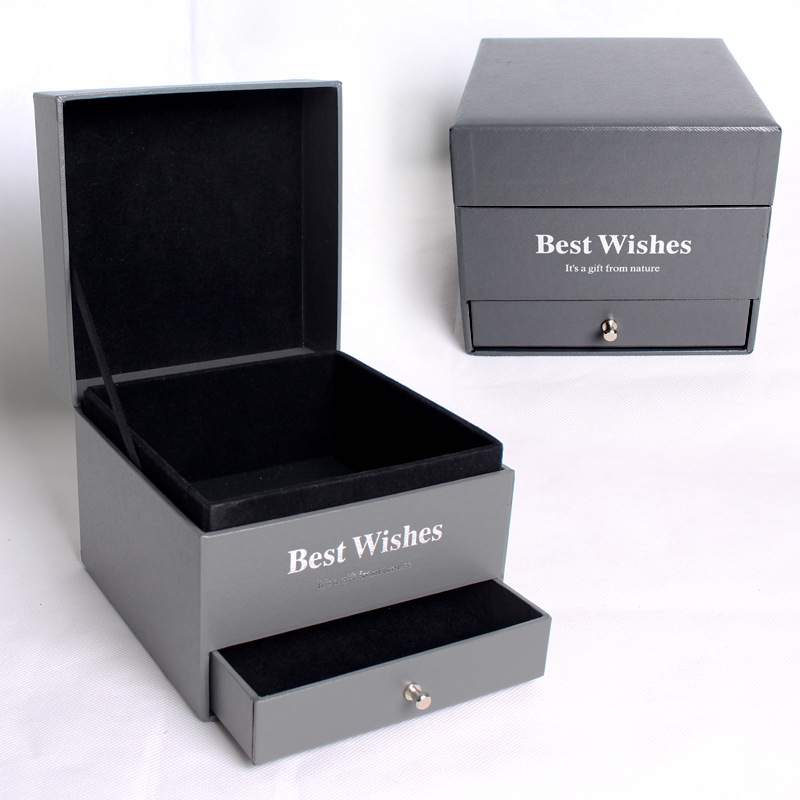
The Jewelry Box is a container for beautiful and
precious gems. Which are most made from
rigid card, plastic, wood and so on. The jewelry box is always with luxury
velvet fabric inside and they are the perfect storage solution for all those
earrings, rings and charms. With individual sections, it's the ideal way to
keep on top of your ever-expanding jewelry collection.
Jewelry Box Jewelry Box,Large Jewelry Box,Small Jewelry Box,Standing Jewelry Box Shenzhen Hongte Printing & Packaging Co., Ltd. , https://www.ipackpaperbox.com
